Network attached storage infrastructure
07 Jul 2013Today we all need storage space and we get it in all kind of flavors: local disks, file servers on the local network, cloud storage, etc. In this post I’ll show you how you can quickly create a basic storage infrastructure that you can use for your data storage.
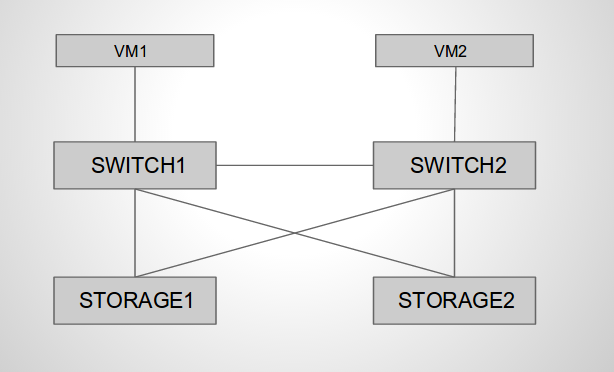
As you may see in the diagram the topology consists of 2 clients, 2 switches and 2 storage servers. All the components in the diagram are KVM virtual machines running on a single host. You can easily create this setup on your own workstation. Clients need to be able to access the files on the storage servers as they would on their local drives. In order to do that we can export file system paths on the storage servers by protocols such as NFS or SMB/CIFS. NFS is my favorite one so I’ll show how you can use it in this example. The clients will be basic Debian VMs running the NFS clients.
Hardware always fails so in order for our system to be available we need to have redundant components. The first storage server will act as the primary server, all the clients will access directly. Data on the primary server will be replicated on the second one which will act as a slave (standby). For the storage file systems we will use ZFS which is both a file system and logical volume manager. ZFS ensures data integrity checks and automatic repairs, it provides various software RAID levels and many other great features such as snapshots, compression, deduplication and replication. In addition to this ZFS is a 128-bit file system providing lots and lots of storage space. Unfortunately ZFS is licensed under Suns CDDL which is not compatible with the Linux kernel license: GPLv2. Work is currently being done for a port of ZFS for the Linux kernel ( ZFS on Linux ). In our topology the storage servers will run zfs on FreeBSD 9.1.
The network infrastructure is very important when we need redundant systems. Each of the storage servers will have 2 NICs grouped in a bridge connected to 2 different switches. In order to prevent bridge loops we need a loop prevention mechanism such as STP. In our environment we will use STP (802.1d) but be aware that in a production network you need other flavors of STP for reduced convergence time. The switches will run Debian as OS and Open vSwitch for the virtual switch.
We can now proceed and start creating our infrastructure. I will be running Debian jessie which is the current testing release on both the host machine and the virtual machines. For the VMs communications on the hypervisor I will be using Linux bridges. Other tools that we need for the VMs management are libvirt, virt-install or virt-manager which provides a gui.
Installing required packages for VMs management:
root@lab:~# aptitude install qemu-kvm qemu-utils libvirt-bin virtinst virt-manager bridge-utilsNow let’s create a bridge for each of the vms links plus an additional one used for out of band management. eth0 is my public interface so i will use it for the management bridge.
root@lab:~# brctl addbr mgmt
root@lab:~# brctl addif mgmt eth0
root@lab:~# brctl addbr vm1-sw1
root@lab:~# brctl addbr vm2-sw2
root@lab:~# brctl addbr sw1-sw2
root@lab:~# brctl addbr sw1-st1
root@lab:~# brctl addbr sw1-st2
root@lab:~# brctl addbr sw2-st2
root@lab:~# brctl addbr sw2-st1
root@lab:~# brctl show
Next thing to do is to create the virtual drives of the vms. I will use qcow2 files as they provide copy-on-write support and snapshots. You can use the qemu-img tools for creating the files. Each of the vms will be assigned one 10GB virtual drive for the OS. The storage servers will have 8 additional 260TB disks used for storage.
root@lab:/var/lib/libvirt/images# qemu-img create -f qcow2 vm1.qcow2 10G
root@lab:/var/lib/libvirt/images# qemu-img info vm1.qcow2
image: file
file format: qcow2
virtual size: 10G (10737418240 bytes)
disk size: 136K
cluster_size: 65536
root@lab:/var/lib/libvirt/images# for i in {1..8}; do qemu-img create -f qcow2 st2.$i.qcow2 260T;done
Now we are ready to shoot the installers. I prefer virt-install which is a CLI tool used for vms installations. You can also use virt-manager which provides a nice GUI. I will do a net install for the Debian VMs and run the installer from an attached cdrom for FreeBSD. You can use different drivers for the I/O devices. For the Linux machines I will use paravirtualized virtio drivers since they offer better performance. I noticed that FreeBSD doesn’t include native virtio support so I will use scsi drives and intel e1000 nics for it. You can even select the cpu model and what cpu features are available to the vm. The extra-args option passes the priority=low to the kernel command line which gets the Debian installer into expert mode.
root@lab:~# virt-install --name vm1 --disk path=/var/lib/libvirt/images/vm1.qcow2,bus=virtio,cache=none,format=qcow2 --network bridge=mgmt,model=virtio --network bridge=vm1-sw1,model=virtio --location=ftp://ftp.lug.ro/debian/dists/wheezy/main/installer-amd64/ --ram=512 --cpu=Nehalem --vcpu=1 --extra-args="priority=low" --vncroot@lab:~# virt-install --name sw1 --disk path=/var/lib/libvirt/images/sw1.qcow2,bus=virtio,cache=none,format=qcow2 --network bridge=mgmt,model=virtio --network bridge=vm1-sw1,model=virtio --network bridge=sw1-st1,model=virtio --network bridge=sw1-st2,model=virtio --network bridge=sw1-sw2,model=virtio --location=ftp://ftp.lug.ro/debian/dists/wheezy/main/installer-amd64/ --ram=512 --cpu=Nehalem --vcpu=1 --extra-args="priority=low" --vncroot@lab:~# virt-install --name st2
--disk path=/var/lib/libvirt/images/st2.qcow2,bus=scsi,cache=none,format=qcow2
--disk path=/var/lib/libvirt/images/st2.1.qcow2,bus=scsi,cache=none,format=qcow2
--disk path=/var/lib/libvirt/images/st2.2.qcow2,bus=scsi,cache=none,format=qcow2
--disk path=/var/lib/libvirt/images/st2.3.qcow2,bus=scsi,cache=none,format=qcow2
--disk path=/var/lib/libvirt/images/st2.4.qcow2,bus=scsi,cache=none,format=qcow2
--disk path=/var/lib/libvirt/images/st2.5.qcow2,bus=scsi,cache=none,format=qcow2
--disk path=/var/lib/libvirt/images/st2.6.qcow2,bus=scsi,cache=none,format=qcow2
--disk path=/var/lib/libvirt/images/st2.7.qcow2,bus=scsi,cache=none,format=qcow2
--disk path=/var/lib/libvirt/images/st2.8.qcow2,bus=scsi,cache=none,format=qcow2
--network bridge=mgmt,model=e1000 --network bridge=sw2-st2,model=e1000 --network bridge=sw2-st1,model=e1000 --ram=8192 --cpu=Nehalem --vcpu=6 --cdrom=/var/lib/libvirt/images/FreeBSD-9.1-RELEASE-amd64-disc1.iso --vncThe installer should be pretty straight forward. Once they are complete we can move forward. We’ll first need to set the IP addresses for the network interfaces and install the required packages. Please note that you need to edit /etc/network/interfaces to make the IP addresses persistent. Quick tip: when you debug network connectivity issues always check the link status of the interfaces ( physical, virtual, bridges, etc) and get tcpdump installed on the same line with your favorite text editor.
NFS Clients:
root@vm1:~# ip addr add 192.168.1.1/24 dev eth1
root@vm1:~# ip link set dev eth1 up
root@vm1:~# aptitude install nfs-common portmap
Now lets’s configure the switches/bridges. One important thing we need to take care of is the STP root bridge of our topology. We need to make sure that one of the switches will be the root bridge otherwise all the traffic will be forwarded by the storage servers bridges and it’s not their job to do that.
Open vSwitch:
root@sw1:~# aptitude install openvswitch-switch openvswitch-common
root@sw1:~# ovs-vsctl add-br sw1
root@sw1:~# for i in {1..4};do ovs-vsctl add-port sw1 eth$i;done;
root@sw1:~# ovs-vsctl show
8910e761-e507-4aa7-88b5-4c26e2e2276e
    Bridge "sw1"
        Port "eth4"
            Interface "eth4"
        Port "sw1"
            Interface "sw1"
                type: internal
        Port "eth1"
            Interface "eth1"
        Port "eth2"
            Interface "eth2"
        Port "eth3"
            Interface "eth3"
    ovs_version: "1.4.2"
root@sw1:~# ovs-vsctl set bridge sw1 stp_enable=true
root@sw1:~# ovs-vsctl set bridge sw1 other_config:stp-priority=0x7800
root@sw1:~# ovs-ofctl show sw1
OFPT_FEATURES_REPLY (xid=0x1): ver:0x1, dpid:0000e22d31067b47
n_tables:255, n_buffers:256
features: capabilities:0xc7, actions:0xfff
 1(eth2): addr:52:54:00:b0:d7:e5
     config:     0
     state:      STP_FORWARD
 2(eth2): addr:52:54:00:79:59:68
     config:     0
     state:      STP_FORWARD
 3(eth3): addr:52:54:00:69:dc:5d
     config:     0
     state:      STP_FORWARD
 4(eth4): addr:52:54:00:e1:4d:dd
     config:     0
     state:      STP_FORWARD
 LOCAL(sw1): addr:e2:2d:31:06:7b:47
     config:     PORT_DOWN
     state:      LINK_DOWN
OFPT_GET_CONFIG_REPLY (xid=0x3): frags=normal miss_send_len=0
Storage machines networking:
root@st1:~# ifconfig bridge create
root@st1:~# ifconfig bridge0 addm em1 addm em2 up
root@st1:~# ifconfig bridge0 proto stp
root@st1:~# ifconfig bridge0 192.168.1.3 netmask 255.255.255.0
root@st1:~# ifconfig bridge0
bridge0: flags=8843<UP,BROADCAST,RUNNING,SIMPLEX,MULTICAST> metric 0 mtu 1500
	ether 02:d8:a2:2f:a0:00
	inet 192.168.1.3 netmask 0xffffff00 broadcast 192.168.1.255
	nd6 options=29<PERFORMNUD,IFDISABLED,AUTO_LINKLOCAL>
	id 52:54:00:04:1b:42 priority 32768 hellotime 2 fwddelay 15
	maxage 20 holdcnt 6 proto stp maxaddr 2000 timeout 1200
	root id 56:ff:97:ea:f6:4b priority 30617 ifcost 20019 port 3
	member: em2 flags=1c7<LEARNING,DISCOVER,STP,AUTOEDGE,PTP,AUTOPTP>
	        ifmaxaddr 0 port 4 priority 128 path cost 20000 proto stp
	        role root state forwarding
	member: em1 flags=1c7<LEARNING,DISCOVER,STP,AUTOEDGE,PTP,AUTOPTP>
	        ifmaxaddr 0 port 3 priority 128 path cost 20000 proto stp
	        role alternate state discarding
We can notice that one of the physical interfaces is in forwarding state and the other one is discarding. The same settings need to be done on the other machines except IP addresses, hostnames and other things that need to be unique. At this point we have the network infrastructure ready with basic connectivity ensured for all the nodes.
We can go ahead and do the storage configuration. As mentioned before storage1 will be the primary storage machine so we’ll start with it.
root@st1:~# camcontrol devlist
<QEMU QEMU DVD-ROM 1.1.>           at scbus1 target 0 lun 0 (pass0,cd0)
<QEMU QEMU HARDDISK 1.1.>          at scbus2 target 0 lun 0 (pass1,da0)
<QEMU QEMU HARDDISK 1.1.>          at scbus2 target 1 lun 0 (pass2,da1)
<QEMU QEMU HARDDISK 1.1.>          at scbus2 target 2 lun 0 (pass3,da2)
<QEMU QEMU HARDDISK 1.1.>          at scbus2 target 3 lun 0 (pass4,da3)
<QEMU QEMU HARDDISK 1.1.>          at scbus2 target 4 lun 0 (pass5,da4)
<QEMU QEMU HARDDISK 1.1.>          at scbus2 target 5 lun 0 (pass6,da5)
<QEMU QEMU HARDDISK 1.1.>          at scbus2 target 6 lun 0 (pass7,da6)
<QEMU QEMU HARDDISK 1.1.>          at scbus3 target 0 lun 0 (pass8,da7)
<QEMU QEMU HARDDISK 1.1.>          at scbus3 target 1 lun 0 (pass9,da8)
The list shows us that we have one dvdrom (installer) and 9 drives (1 for the OS and 8 for the storage) attached.
ZFS: Let’s create the ZFS storage pool. The pool will be made up of 4 mirrors of 2 x 260TB drives. ZFS mirrors are similar to RAID1 level. All the mirrors are striped so the resulting pool will have a RAID10 like fault tolerance. The total capacity of the pool will be of 1 Petabyte :)
root@st1:~# zpool create storage mirror da1 da2 mirror da3 da4 mirror da5 da6 mirror da7 da8
root@st1:~# zpool list
NAME      SIZE  ALLOC   FREE    CAP  DEDUP  HEALTH  ALTROOT
storage  1.01P   110M  1.01P     0%  1.00x  ONLINE  -
root@st1:~# zpool status
  pool: storage
 state: ONLINE
  scan: none requested
config:
	NAME        STATE     READ WRITE CKSUM
	storage     ONLINE       0     0     0
	  mirror-0  ONLINE       0     0     0
	    da1     ONLINE       0     0     0
	    da2     ONLINE       0     0     0
	  mirror-1  ONLINE       0     0     0
	    da3     ONLINE       0     0     0
	    da4     ONLINE       0     0     0
	  mirror-2  ONLINE       0     0     0
	    da5     ONLINE       0     0     0
	    da6     ONLINE       0     0     0
	  mirror-3  ONLINE       0     0     0
	    da7     ONLINE       0     0     0
	    da8     ONLINE       0     0     0
errors: No known data errors
root@st1:~# zfs get all storage
We can now create a dataset inside the storage pool setting specific attributes. For instance, let’s create a dataset that has compression enabled:
root@st1:~# zfs create -o compression=on storage/compset
root@st1:~# zfs get compression storage/compset
NAME             PROPERTY     VALUE     SOURCE
storage/compset  compression  on        local
Now let’s ctually see the benefits:
root@st1:~# cd /storage/compset/
root@st1:compset# dd if=/dev/zero of=10M bs=1M count=10
10+0 records in
10+0 records out
10485760 bytes transferred in 0.014196 secs (738633678 bytes/sec
root@st1:compset# du -h 10M
512B	 10M
root@st1:compset# dd if=/dev/random of=10Mr bs=1M count=10
10+0 records in
10+0 records out
10485760 bytes transferred in 0.176115 secs (59539266 bytes/sec)
root@st1:compset# du -h 10Mr
 10M	 10Mr
Let’s say we need storage space for users. We can create a dataset for that and assign each user a dataset that has an assigned quota:
root@st1:storage# zfs create storage/users
root@st1:storage# zfs create -o quota=10M storage/users/01
root@st1:storage# cd /storage/users/01
root@st1:01# dd if=/dev/random of=20M bs=1M count=20
dd: 20M: Disc quota exceeded
root@st1:01# du -h 20M
 10M	20M
Sanpshots: ZFS provides snapshot functionality which is an image of the file system at the time you snapshot it. Let’s create a new data set called set, create some random files inside it and then snapshot it calling it snap1.
root@st1:~# zfs create storage/set
root@st1:~# cd /storage/set/
root@st1:set# mkfile 1M 1M
root@st1:set# mkfile 5M 5M
root@st1:set# zfs snapshot storage/set@snap1
root@st1:set# ls .zfs/snapshot/snap1/
1M 5M
How can we replicate all the data to the other storage machine ? ZFS enables you to transfer snapshots to another machine by piping zfs send and zfs recive which is pretty awesome. The receiving end will extract the snapshot and recreate the file system.
We have an empty storage pool called storage on storage2 where we’ll transfer snap1 we have just created. We’ll use netcat for raw tcp piping but you can also use ssh.
root@st2:~# netcat -l -p 9999 | zfs receive storage/set
root@st1:~# zfs send storage/set@snap1 | netcat st2 9999
root@st2:~# zfs list
NAME          USED  AVAIL  REFER  MOUNTPOINT
storage      6.14M   508T    32K  /storage
storage/set  6.03M   508T  6.03M  /storage/set
root@st2:~# ls /storage/set/
1M 5M
You can also send incremental data using zfs send. We’ll create an additional file in /storage/set, create a snapshot and transfer only the differences between the second and the first snapshot. We’ll use ssh this time:
root@st1:set# mkfile 10M 10M
root@st1:set# zfs snapshot storage/set@snap2
root@st1:set# zfs send -i storage/set@snap1 storage/set@snap2  | ssh st2 zfs receive storage/set
root@st2:~# ls /storage/set/
10M 1M  5M
What happens if we delete a file ?
root@st1:set# rm * && touch Lala
root@st1:set# zfs snapshot storage/set@snap3
root@st1:set# zfs send -i storage/set@snap2 storage/set@snap3  | ssh st2 zfs receive storage/set
root@st2:~# ls /storage/set/
Lala
Using the great snapshot and zfs send and receive features we could easily set up a cron job that does periodic incremental transfers thus having all the data on storage1 replicated on storage2. Now that we have all the storage prepared let’s mount it on the clients by NFS. On the storage server prepare the /etc/exports file:
root@st1:set# cat /etc/exports
/storage/set -maproot=root 192.168.1.1
root@st1:set# /etc/rc.d/mountd onereload
root@vm1:~# mount st1:/storage/set /mnt -v
root@vm1:~# df -h | grep st1
Filesystem                                              Size  Used Avail Use% Mounted on
st1:/storage/set                                       1016T     0 1016T   0% /mnt
Now let’s go for a failover test of the bridged interfaces on the storage machine. We’ll start writing a random file using dd in vm1:/mnt, shutdown the forwarding interface on storage1 and wait to see what happens.
root@vm1:~# dd if=/dev/vda of=/root/random bs=1M count=10
root@vm1:~# md5sum /root/random
9662731c837501f21938b04e09aa02b3  random
root@vm1:~# dd if=/root/random of=/mnt/random
root@st1:set# ifconfig bridge0
bridge0: flags=8843<UP,BROADCAST,RUNNING,SIMPLEX,MULTICAST> metric 0 mtu 1500
	ether 02:d8:a2:2f:a0:00
	inet 192.168.1.3 netmask 0xffffff00 broadcast 192.168.1.255
	nd6 options=29<PERFORMNUD,IFDISABLED,AUTO_LINKLOCAL>
	id 52:54:00:04:1b:42 priority 32768 hellotime 2 fwddelay 15
	maxage 20 holdcnt 6 proto stp maxaddr 2000 timeout 1200
	root id 56:ff:97:ea:f6:4b priority 30617 ifcost 20000 port 4
	member: em2 flags=1c7<LEARNING,DISCOVER,STP,AUTOEDGE,PTP,AUTOPTP>
	        ifmaxaddr 0 port 4 priority 128 path cost 20000 proto stp
	        role root state forwarding
	member: em1 flags=1c7<LEARNING,DISCOVER,STP,AUTOEDGE,PTP,AUTOPTP>
	        ifmaxaddr 0 port 3 priority 128 path cost 20000 proto stp
	        role alternate state discarding
root@st1:set# ifconfig em2 down
root@st1:set# ifconfig bridge0
bridge0: flags=8843<UP,BROADCAST,RUNNING,SIMPLEX,MULTICAST> metric 0 mtu 1500
	ether 02:d8:a2:2f:a0:00
	inet 192.168.1.3 netmask 0xffffff00 broadcast 192.168.1.255
	nd6 options=29<PERFORMNUD,IFDISABLED,AUTO_LINKLOCAL>
	id 52:54:00:04:1b:42 priority 32768 hellotime 2 fwddelay 15
	maxage 20 holdcnt 6 proto stp maxaddr 2000 timeout 1200
	root id 56:ff:97:ea:f6:4b priority 30617 ifcost 20019 port 3
	member: em2 flags=1c7<LEARNING,DISCOVER,STP,AUTOEDGE,PTP,AUTOPTP>
	        ifmaxaddr 0 port 4 priority 128 path cost 20000 proto stp
	        role disabled state discarding
	member: em1 flags=1c7<LEARNING,DISCOVER,STP,AUTOEDGE,PTP,AUTOPTP>
	        ifmaxaddr 0 port 3 priority 128 path cost 20000 proto stp
	        role root state learning
root@st1:set# ifconfig bridge0
bridge0: flags=8843<UP,BROADCAST,RUNNING,SIMPLEX,MULTICAST> metric 0 mtu 1500
	ether 02:d8:a2:2f:a0:00
	inet 192.168.1.3 netmask 0xffffff00 broadcast 192.168.1.255
	nd6 options=29<PERFORMNUD,IFDISABLED,AUTO_LINKLOCAL>
	id 52:54:00:04:1b:42 priority 32768 hellotime 2 fwddelay 15
	maxage 20 holdcnt 6 proto stp maxaddr 2000 timeout 1200
	root id 56:ff:97:ea:f6:4b priority 30617 ifcost 20019 port 3
	member: em2 flags=1c7<LEARNING,DISCOVER,STP,AUTOEDGE,PTP,AUTOPTP>
	        ifmaxaddr 0 port 4 priority 128 path cost 20000 proto stp
	        role disabled state discarding
	member: em1 flags=1c7<LEARNING,DISCOVER,STP,AUTOEDGE,PTP,AUTOPTP>
	        ifmaxaddr 0 port 3 priority 128 path cost 20000 proto stp
	        role root state forwarding
The result:
root@vm1:~# dd if=/root/random of=/mnt/random
10+0 records in
10+0 records out
10485760 bytes (10 MB) copied, 56.1668 s, 187 kB/s
root@st1:set# md5 random
MD5 (random) = 9662731c837501f21938b04e09aa02b
Transfer was very slow but your data is uncorrupted on the remote storage. I hope you enjoyed this long tutorial :) Let me know if you any questions or other observations and I’ll be more than happy to answer.