OSPF lab provisioning on IOS with Ansible
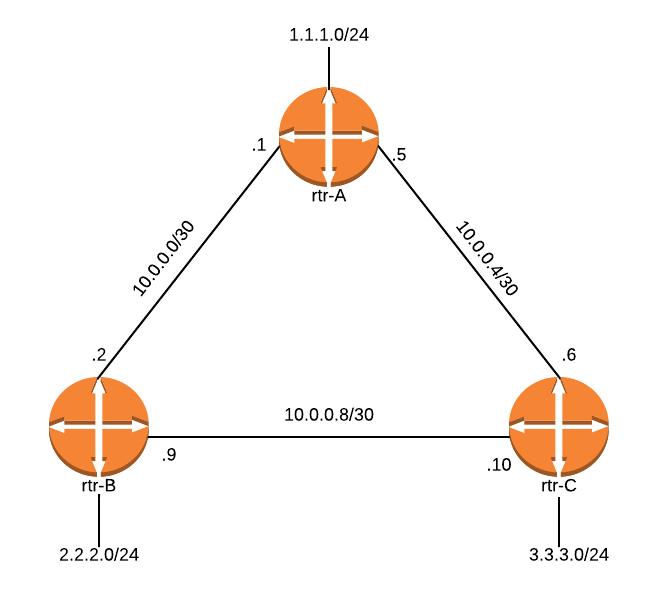
24 Feb 2015In this post we’ll see how we can quickly get a basic OSPF lab deployed by using Ansible. Our setup consists of 3 x Cisco IOS routers which are connected according to the diagram below. All the routers should already have SSH set up and an interface connected to the management network that will be used for retrieving the configuration files from the server. On the server side we need a Linux machine that has Ansible installed.
So let’s get started by building the Ansible playbook. I’ll explain the site.yml file below:
- Run the playbook on the ‘localhost’ server by using the ‘marius’ username with sudo
- Install and start Apache as the routers will pull the config files over HTTP
- Install Git - used to clone the netmiko library repo
- Install paramiko - dependency library for netmiko
- Clone the netmiko repo and install it as a system module
- Next we use the netmiko.j2 template to create a script file. The script uses netmiko and takes as arguments the ip address, username, password and command that will be run on the remote Cisco device.
- We generate the configuration files that are going to be pulled by the routers. For this we use the config.j2 template and write the configuration files on the Apache DocumentRoot. This will results in 3 files: /var/www/html/rtr-A.config, /var/www/html/rtr-B.config, /var/www/html/rtr-C.config containing the configuration commands for each of the routers.
- We run the script that we have created on step 6 by passing the ‘copy http://server_ip/config_file_name running-config’ command to each of the routers.
- Define the variables used in the template files and commands.
Now let’s go through the template files. The config.j2 template is used to build the configuration commands that will be loaded by the routers. What this does is basically loop through the interfaces defined for each of the routers and create the ip address statements for each of them. After this, it generates an entry for the ospf process and creates a network statement if the ‘ospf’ variable is set to yes for a specific interface.
The netmiko.j2 template is just a python script that’s using netmiko to connect to the router, first runs ‘file prompt quiet’ configuration command to disable the save confirmation message. Then it runs the command that’s passed as the 4th argument.
netmiko.j2
#!/usr/bin/env python
import netmiko
import sys
cisco_881 = {
	'device_type': 'cisco_ios',
	'ip':   sys.argv[1],
	'username': sys.argv[2],
	'password': sys.argv[3],
	'secret': 'secret',
	'verbose': False,
}
SSHClass = netmiko.ssh_dispatcher(device_type=cisco_881['device_type'])
net_connect = SSHClass(**cisco_881)
config_commands = [ 'file prompt quiet' ]
output = net_connect.send_config_set(config_commands)
output = net_connect.send_command(sys.argv[4])
In order to run this we will also need the /etc/ansible/hosts file to contain the localhost hostname. You can find all the files in this GitHub repo: https://github.com/remoteur/ansible-ospflab.git
Once we have all the files in place we can run the playbook by the ‘ansible-playbook site.yml’ command. This is how the output looks like:
ansible-playbook site.yml
PLAY [localhost] **************************************************************
GATHERING FACTS ***************************************************************
ok: [localhost]
TASK: [Install Apache] ********************************************************
ok: [localhost]
TASK: [Start Apache] **********************************************************
ok: [localhost]
TASK: [Install Git] ***********************************************************
ok: [localhost]
TASK: [Install paramiko] ******************************************************
ok: [localhost]
TASK: [Clone netmiko] *********************************************************
ok: [localhost]
TASK: [Install netmiko] *******************************************************
changed: [localhost]
TASK: [Create netmiko script] *************************************************
ok: [localhost]
TASK: [Generate config file] **************************************************
ok: [localhost] => (item={'mgmt_pass': 'parola', 'int': [{'netmask': '255.255.255.252', 'ospf': 'yes', 'name': 'GigabitEthernet0/1', 'address': '10.0.0.1'}, {'netmask': '255.255.255.252', 'ospf': 'yes', 'name': 'GigabitEthernet0/2', 'address': '10.0.0.5'}, {'netmask': '255.255.255.0', 'ospf': 'yes', 'name': 'Loopback0', 'address': '1.1.1.1'}], 'name': 'rtr-A', 'mgmt_ip': '192.168.0.81', 'mgmt_user': 'admin'})
ok: [localhost] => (item={'mgmt_pass': 'parola', 'int': [{'netmask': '255.255.255.252', 'ospf': 'yes', 'name': 'GigabitEthernet0/1', 'address': '10.0.0.2'}, {'netmask': '255.255.255.252', 'ospf': 'yes', 'name': 'GigabitEthernet0/2', 'address': '10.0.0.9'}, {'netmask': '255.255.255.0', 'ospf': 'yes', 'name': 'Loopback0', 'address': '2.2.2.2'}], 'name': 'rtr-B', 'mgmt_ip': '192.168.0.78', 'mgmt_user': 'admin'})
ok: [localhost] => (item={'mgmt_pass': 'parola', 'int': [{'netmask': '255.255.255.252', 'ospf': 'yes', 'name': 'GigabitEthernet0/1', 'address': '10.0.0.6'}, {'netmask': '255.255.255.252', 'ospf': 'yes', 'name': 'GigabitEthernet0/2', 'address': '10.0.0.10'}, {'netmask': '255.255.255.0', 'ospf': 'no', 'name': 'Loopback0', 'address': '3.3.3.3'}], 'name': 'rtr-C', 'mgmt_ip': '192.168.0.79', 'mgmt_user': 'admin'})
TASK: [Connect to routers and pull the config] ********************************
changed: [localhost] => (item={'mgmt_pass': 'parola', 'int': [{'netmask': '255.255.255.252', 'ospf': 'yes', 'name': 'GigabitEthernet0/1', 'address': '10.0.0.1'}, {'netmask': '255.255.255.252', 'ospf': 'yes', 'name': 'GigabitEthernet0/2', 'address': '10.0.0.5'}, {'netmask': '255.255.255.0', 'ospf': 'yes', 'name': 'Loopback0', 'address': '1.1.1.1'}], 'name': 'rtr-A', 'mgmt_ip': '192.168.0.81', 'mgmt_user': 'admin'})
changed: [localhost] => (item={'mgmt_pass': 'parola', 'int': [{'netmask': '255.255.255.252', 'ospf': 'yes', 'name': 'GigabitEthernet0/1', 'address': '10.0.0.2'}, {'netmask': '255.255.255.252', 'ospf': 'yes', 'name': 'GigabitEthernet0/2', 'address': '10.0.0.9'}, {'netmask': '255.255.255.0', 'ospf': 'yes', 'name': 'Loopback0', 'address': '2.2.2.2'}], 'name': 'rtr-B', 'mgmt_ip': '192.168.0.78', 'mgmt_user': 'admin'})
changed: [localhost] => (item={'mgmt_pass': 'parola', 'int': [{'netmask': '255.255.255.252', 'ospf': 'yes', 'name': 'GigabitEthernet0/1', 'address': '10.0.0.6'}, {'netmask': '255.255.255.252', 'ospf': 'yes', 'name': 'GigabitEthernet0/2', 'address': '10.0.0.10'}, {'netmask': '255.255.255.0', 'ospf': 'no', 'name': 'Loopback0', 'address': '3.3.3.3'}], 'name': 'rtr-C', 'mgmt_ip': '192.168.0.79', 'mgmt_user': 'admin'})
PLAY RECAP ********************************************************************
localhost                  : ok=10   changed=2    unreachable=0    failed=0
This is how one of routers configuration files looks like:
/var/www/html/rtr-A.config :
interface GigabitEthernet0/1
no shutdown
ip address 10.0.0.1 255.255.255.252
interface GigabitEthernet0/2
no shutdown
ip address 10.0.0.5 255.255.255.252
interface Loopback0
no shutdown
ip address 1.1.1.1 255.255.255.0
router ospf 1
network 10.0.0.1 0.0.0.0 area 0
network 10.0.0.5 0.0.0.0 area 0
network 1.1.1.1 0.0.0.0 area 0
So now we have the lab up and running. Why bother automating this? In the end it’s a basic test environment. Here’s my motivation:
- I hate doing repetitive stuff
- Reproducibility. Manual repetitive stuff results in errored configurations, at least for me. If I do such a setup manually I usually get a terminal started for each of the routers and start writing commands. My problem is that almost all the time I end up messing up something like setting the wrong IP addresses on interfaces. By running this playbook I will always get the same result
- I have the complete picture in one place and I can check the whole setup before running it, no need to switch through terminals, screens or other stuff
- Time. I’m running this setup on Openstack by using Cisco vIOS images so getting everything up and running from scratch takes me less than 5 minutes which is pretty awesome
Let me know if you have any questions and I’ll be more than happy to answer. Thanks