HA Openstack deployment using RDO-Manager
17 Oct 2015In this post I’ll describe the steps needed to deploy an Openstack environment with 3 HA Controllers and 2 Nova compute nodes in a virtual environment.
The setup was created by following the RDO-Manager Liberty docs.
Assumptions:
- The instack-virt-setup script has created 5 VMs (export NODE_COUNT=5)
Instructions page: Environment Setup -> Virtual Environment - You have completed the undercloud installation by using the default undercloud.conf Instructions page: Undercloud Installation -> Installing the Undercloud
- You have completed images build and upload steps, nodes registration and introspection, flavors creation and configured the nameserver for the control plane network.
Instructions page: Basic deployment
Infrastructure
At this point the undercloud has all the required pieces to start deploying the overcloud. As with any kind of infrastructure deployment which involves more than one machine we need to make sure we understand how the components interact with each other.
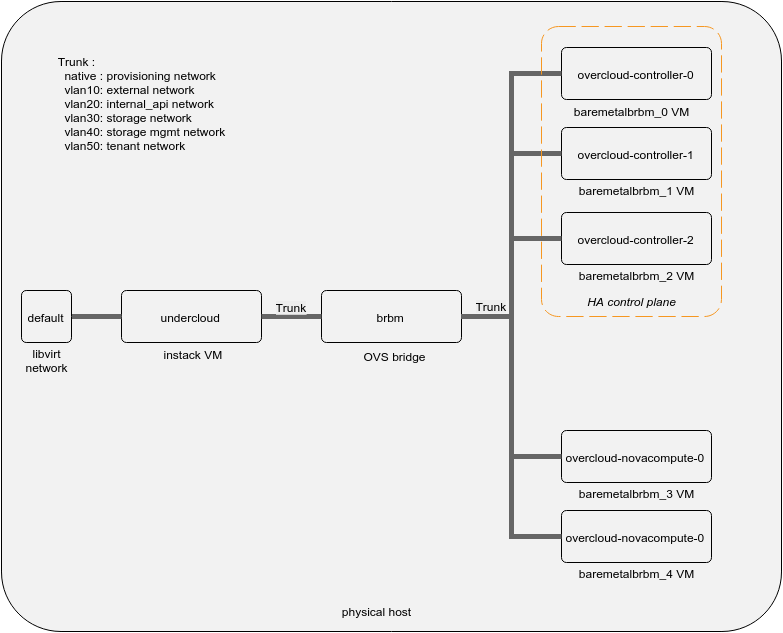
Below is a diagram that shows the components created by the instack-virt-setup script and how we want to consume them in our deployment.
-
instack VM: this is the VM that runs the undercloud. It’s got 2 nics: one connected to the libvirt default network which provides Internet connectivity and another one connected to the brbm bridge. The latter is connected to the provisioning network.
-
brbm OVS bridge: this will act as a L2 switch for interconnecting the undercloud with the overcloud nodes. By default the OVS ports are trunks, forwarding frames with any vlan tag.
-
baremetal_brbm VMs: these are the VMs that will run the overcloud nodes. Their number depends on how many you specified in the NODE_COUNT variable. All these VMs get created with a single nic connected to the brbm bridge by default.
Before going further let’s take a minute and verify these settings on the undercloud:
We can see that eth1(2nd nic) is bridged to br-ctlplane which has 192.0.2.1/24 as IP address. As you can see in the neutron subnet details it also acts as a default gateway for the ctlplane net (the provisioning network). This is because we want the undercloud machine to act as a router since it’s the single exit point to the Internet in the virtual environment. In addition there is also a masquerade rule which translates the source address for packets coming from the provisioning network. We can also see that a neutron port already exists in the provisioning network. This is actually the dhcp agent which will provide DHCP services for the overcloud nodes during the deployment.
Overcloud planning
Now we can move forward to the overcloud deployment planning. We would like to deploy an Openstack environment with the following characteristics:
- HA control plane with 3 x controller nodes
- 2 x Nova compute nodes
- Achieve service isolation by binding them on separate networks running on top of different vlans
Let’s first make a copy of the tripleo-heat-templates tree in our home directory and use it for doing any modifications and run the deployment. As the docs mention use this approach with caution as you will need to rebase any local changes on updates to the openstack-tripleo-heat-templates package.
stack@instack:~>>> mkdir the-cloud
stack@instack:~>>> cp -r /usr/share/openstack-tripleo-heat-templates/* the-cloud/
To enable network isolation we need to prepare the nic templates and an environment file which describe how the network interface configuration files on the overcloud nodes will be created. Thankfully, predefined templates for a single nic with vlan isolation environment are provided. Each role has its own template as not all the roles require connectivity to all the networks. Let’s take as example the controller role which requires connectivity to all the networks:
We can see a bunch of parameters which describe things such as network subnets, vlan IDs, router address, etc. Some of them have default values(such as the vlan IDs which we’re going to use in our deployment) and some of them don’t thus we’ll have to provide them in the environment file.
Going forward to the resources section we can see how the interfaces get created and the IP addresses assignment is done. Basically it first creates an OVS bridge having the name passed in the bridge_name parameter (defaults to br-ex). It then gets the DNS servers addresses from the DnsServers parameter (we’ll set it later in the environment file). In the next step it assigns an IP address from the ctlplane network to the br-ex bridge. Next it adds a static route for the Nova metadata service via the EC2MetadataIp parameter(which we’ll pass in the environment file). Going further to the members section we can see nic1 as type interface which means it’s going to bridge nic1(first connected nic, in our case eth0) to the br-ex bridge. In the next steps it creates the vlan interfaces, taking as parameters the vlan IDs and the subnets for each of the networks. For the external network it adds a static route to 0.0.0.0/0 (default route) via the ExternalInterfaceDefaultRoute parameter (passed later in the environment file).
You can go ahead and also check the nic templates for the other roles. You’ll see that the main difference is that they don’t have connections to all the vlans and the default route is set through the ControlPlaneDefaultRoute(set in the environment file) which is actually the undercloud’s IP address on the provisioning network.
Let’s go to the next step and create the network environment file:
Here we set the networks subnets, allocation pools together with other parameters which were previously described in the template walkthrough.
More thorough details on the network isolation bits can be found on the docs page: Network Isolation Docs
We’ve seen earlier that the undercloud is used as a router for the provisioning network. Now that we want to have the overcloud provisioned with an external network which also requires Internet connectivity we must set an additional interface on the undercloud. This has to match the external network vlan id and the ExternalInterfaceDefaultRoute parameter set in the environment file. This step is also required because, during the overcloud deployment, the undercloud will try to reach the public VIP of the overcloud for post config initialization.
Deploy!
We’re almost ready for deployment. Let’s build the deploy command and fire it up:
Some explanations on the command arguments:
- control-scale: number of controller nodes
- compute-scale: number of compute nodes
- libvirt-type: virtualization type; since we’re running hypervisors on VMs we’ll use qemu
- ntp-server: HA deployments require an NTP server for time syncronization
- templates: location of the Heat templates directory
- puppet-pacemaker.yaml: enables Pacemaker as cluster resource manager; required in HA environments
- network-isolation.yaml : enables the creation of Neutron ports in the isolated networks
- net-single-nic-with-vlans.yaml: enables the use of single-nic-vlans templates
- network-environment.yaml: the environment file we have built earlier
To monitor the deployment progress I usually run in a separate terminal:
watch -n1 'heat stack-list -n | grep PROGRESS'This way I can see if any nested stack gets stuck for long time, comparing the current time with the timestamps of the the stacks.
I also watch the output of nova list. During the early stages of the deployment you should see the instances being in spawning state:
This usually means that the nodes are booted in the deploy stage and transferring the overcloud image to disk. Once it gets written the nodes will reboot, the nova instances will show as active, they’ll load the image from disk and you’ll be able to reach them via ssh.
SSH access can be done by using the undercloud stack user private key and heat-admin as remote user. Let’s jump in overcloud-controller-0 and see what’s happening there:
stack@instack:~>>> ssh [email protected]You can check the os-collect-config and /var/log/messages for deployment logs or errors:
[heat-admin@overcloud-controller-0 ~]$ sudo journalctl -fl -u os-collect-config
[heat-admin@overcloud-controller-0 ~]$ sudo tail -f /var/log/messages
You may check the actual result of the controller nic template showed earlier. This will end up in the /etc/os-net-config/config.json file which is used by os-net-config to build the ifcfg scripts in /etc/sysconfig/network-scripts.
Once the deployment is done you will get a resulting overcloudrc file that you just need to source and then you’ll have the overcloud Openstack at your disposal.